Blogspot custom domain 404 error FIX
Hi friends blogspot custom domain 404 error FIX and now you can Redirect you blogspot blog to custom Domain If you have recently bought custom domain from any hosting service you have seen this error "404. That’s an error. The requested URL / was not found on this server. That’s all we know." after mapping but now it has been fix but let me remind you at present it is only working in new interface of blogger so if you are on old interface then you will have to switch to new blogger interface. Get more information here.
As in my previous post i told that we got error 404 after mapping but today my site become live successfully so here is how to map domain name bought from Bigrock here is how to map domain name bought from bigrock with blogger blog. As the instruction is for old interface so i am going to show you how to map custom domain in new interface of bloggers.
Step by step instructions to map domain:
All the steps are completed Congratulations Now your blog is on top level domain
Wait for few hours in some case it may take upto maximum 24 hours to process and become live.
As in my previous post i told that we got error 404 after mapping but today my site become live successfully so here is how to map domain name bought from Bigrock here is how to map domain name bought from bigrock with blogger blog. As the instruction is for old interface so i am going to show you how to map custom domain in new interface of bloggers.
Step by step instructions to map domain:
- All instruction are same except one or two!
- First of all buy custom Domain and configure DNS Click here to read how to config DNS
- After that go to blogger and switch to new interface.
- Then select the blog for which you want to map domain name
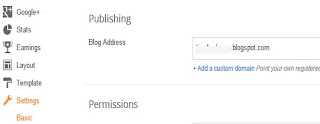
- Then click on setting >> Basic >> Publishing>>Blog Address>> + Add a custom domain see image below:
- Then click on + Add a custom domain and you will see advance settings enter the domain name that you bought as example "www.myblog.com"> and save redirect myblog.com to www.myblog.com and save again.
- Then click on "settings instructions" it will ask to leave this page you will be redirected to another page click on "On a top-level domain"
- Now see under CNAME section before we have to add only one cname but now there are two so add the second one also in cname .section of DNS setting under control panel fron where you bought your domain name.
All the steps are completed Congratulations Now your blog is on top level domain
Wait for few hours in some case it may take upto maximum 24 hours to process and become live.


